Cook Italian workshop

0 comments


Last week was hectic-a birthday, an anniversary and a workshop. For most of the week, dinner was simple Italian because I was preparing for the Italian workshop. I had calls from folks who wanted to know if it was going to be the baked cheesy kind of food. I like baked cheesy kind of food but what I was going to demonstrate was the healthier kind. With home made pasta.


Homemade fettuccine with pesto
Garlic bread


Linguine with salsa pomodori

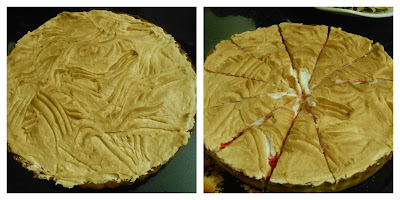
Cherry cheese pie


The second part of the workshop is on October 27th.

Mushroom and two cheese calzone, gnocchi with Gorgonzola sauce, spinach cannelloni and an apple butterscotch pie.

Mamma mia!

Pepper, parmesan and herb loaf

0 comments


Ahh! The joys of blogging! October 16th was World Bread Day (I didn't know there was such a day till I became a regular on Facebook). One of the groups I'm a member of had invited people to bake bread, any bread.

I almost gave it a miss because of my crazy schedule but then decided that since I like bread so much, I should at least try to get one done.

But what? So many had baked focaccia, some had baked pull apart rolls, many had done twisted loaves. Flipping through books and the Internet didn't help, not when you're under a bit of pressure and the 1 hour scheduled power cut at 3 pm was drawing nearer...

Oh! Got it! There was a nice picture of a loaf that had herbs and parmesan cheese.  OK! Quick, measure the flour, the yeast... wait a minute, wait a minute! Why follow the same recipe?

And so this recipe was born. I was intrigued by the parmesan cheese. What would the loaf taste like? Umami? Or would the rosemary mask that taste? How much could I use to allow the flavour of both cheese and herbs come through?


In the meantime, the cake was ready to go into the oven. Yes, in the middle of all this, I had to bake a cake. I was aiming to finish baking the cake and then popping the bread into the oven and have it all be done by 3 pm. Alas, that was not to be.

The flour was weighed out, along with all the other dry ingredients. Herbs were chopped, cheese grated, the processor made short work of kneading and then the dough was ensconced in a glass bowl for proofing. The cake was still baking and half an hour before the dreaded power cut, I decided that there was no point in shaping the loaf and leaving it to proof for more than an hour.

The dough was through with the first rising so I pushed out all the air and bunged both dough and bowl in the fridge.

Half an hour before the end of the power cut, I brought out the bowl. The dough has risen beautifully but from past experience, I knew that the bread wouldn't necessarily look pretty.

I shaped the dough into 2 loaves. Scored the tops and by then, the power was back. Just my luck- the voltage was low and by the time the thermostat climbed to the required temperature, the dough had over proofed.

But the loaf tasted really nice. Freshly baked, the flavour of the herbs shone through. Could have done with a little more thyme. But a couple of hours later, the herbs had toned down and the umami flavour was beginning to wake up. With little nips from the pepper. Ooh, nice.


Pepper, parmesan and herb loaf

Ingredients
500 gm flour
1 tsp gluten
1 tsp bread improver
1 1/2 teaspoons salt
2 teaspoons instant yeast
2 tablespoons sugar
40 gm soft butter
1/2 teaspoon freshly ground pepper
4 gm fresh rosemary, finely chopped
1 tablespoon fresh thyme, chopped
85 gm grated parmesan cheese
225 gm warm water

Method
Sift flour, gluten, improver (both optional) and salt together onto a worktop.
Mix through the yeast and sugar.
Make a well in the centre, pour in most of the water and combine into a dough.
Mix in butter, pepper, herbs and the cheese.
Knead well till the dough is soft, smooth and springy. Add more water if necessary to get to this consistency.
(In case you are using a bread maker or a processor, follow the instructions till you reach this step.)
Place dough in a big greased bowl, cover the top with clingfilm and leave to rise for about 45 minutes to 1 hour or till the dough has doubled in size.
Remove the clingfilm, punch down the dough to release the trapped air.
Place the dough on a lightly floured worktop, knead lightly for about half a minute.
Divide dough into 2, dust a little more flour on the worktop and roll each dough into a 10" log.
Place on a baking tray. Score the tops lightly and leave to prove for about 20 minutes or till doubled.
Spray a little water over the loaves, sprinkle a little flour over the tops and bake at 200°C for about 20 minutes or till the loaves have baked to a golden colour.
Take the loaves out of the oven.
With mittened hands, turn them over and tap the base. It should sound hollow, indicating they are done.


Pandan chiffon cake

0 comments


I always have a pot of pandan growing in my balcony. The plant is easy to grow, looks a little untidy but is an essential for a Singaporean kitchen. The dark green sword like leaves look pretty unremarkable; when they are added into a pot of Basmati rice, the flavour the rice takes on is amazing.

Pandan leaves

Making a pandan chiffon cake is another way of using this leaf. Here, the leaf is used for both colour and flavour. To extract the juice, you'll need about 5 leaves. Wash them well, cut them into small bits after removing the central vein, then put them in a blender with very little water. Pulse it till the leaves are ground, then strain it through a piece of muslin. Ready to use pandan paste which has both the flavour and colour is also available in stores in Singapore.

My recipe for pandan chiffon cake uses oil and coconut milk.
You can use canned coconut milk but if you prefer making your own, grate half a coconut, add a little warm water to it and blitz it in a blender for a couple of seconds. Pass it through a piece of muslin and squeeze out all the liquid. It should measure about 200 ml.

The cake is unbelievably soft and light. Pandan is of course an acquired taste and one can get used to its taste soon enough.

Left: stiffly beaten egg whites. Right: foamy egg yolks 

I use 7 eggs for this recipe, they need to be separated and to save washing up, I whip up the whites with half the sugar first, also adding the cream of tartar. Then the yolks are beaten with the remaining sugar, a little more cream of tartar, oil, pandan juice, vanilla essence and coconut milk. At this stage, a little green colouring can be added.


The flour and baking powder are gently folded into the yolk mixture, then the stiffly beaten egg whites are folded in.


The batter is poured into an ungreased tube pan and baked. If you don't have a tube pan, you can use a ring pan but of course it won't look like a chiffon cake.


After the cake is baked, the tube pan is turned over a wire rack and the cake left to cool.


This supersoft cake can be stored at room temperature for a day, after which it has to be refrigerated.


Pandan chiffon cake

Ingredients
150 gm flour
1/2 tsp baking powder

7 egg whites
1/2 tsp cream of tartar
100 gm sugar

7 egg yolks
1/4 tsp cream of tartar
100 gm sugar

60 gm vegetable oil
3 tbsp fresh pandan juice or about 1/2 tsp pandan flavouring
1 tsp vanilla essence
200 ml thick coconut milk
A little green food colour (optional)

Method
Sieve together the flour and baking powder, keep aside.
Put the egg whites, cream of tartar and sugar into a mixing bowl and beat with an electric beater till stiff.
In another bowl, place the egg yolks, cream of tartar and sugar and beat till light and foamy.
Add in the oil, pandan juice or flavouring, vanilla essence, coconut milk and the food colour. Stir it in well into the yolk foam, then gently blend in the sifted flour.
Pour into an ungreased 9" tube pan and bake at 175°C for about 50 minutes. The top of the cake should be firm to the touch.
Turn the tube pan over a wire rack and let the cake cool to room temperature.
Run a thin blade or a firm strip of plastic all around the edge of the pan to loosen it from the pan.
Slice with a serrated knife.
  

Fudgy butterscotch and white chocolate chip cookies

11 comments


Ok, I just couldn't help doing just one more post on chocolate chips. In my defense, I'd like to say that I wanted to do a great service to white chocolate chip aficionados who might have missed out on this great recipe for the fudgyiest most fudgy butterscotch and white chocolate chip cookies that ever were made.

A word of warning-these cookies are highly addictive.

The butterscotch chips used in this recipe are crunchy ones, not the ones that can be melted. If unavailable, you can replace them with white or dark chocolate chips.

So without further preamble, we get right to the recipe.


The dough

Butterscotch and white chocolate chip cookies 
Ingredients
225 gm flour
1/2 teaspoon baking soda
1/4 tsp salt
200 gm butter
185 gm brown sugar
1 egg
100 gm chocolate chips
100 gm butterscotch chips

Method
Lightly crush the butterscotch chips. Some of them can be left whole.
Sift flour, baking soda and salt, keep aside.
Place butter and brown sugar in a mixing bowl, cream using an electric beater.
Add in egg, mix for half a minute then add in both kinds of chips and the flour.
Mix well to combine.
Place spoonfuls of the mixture onto parchment lined baking sheets, leaving plenty of space between the cookies.
Bake at 170°C for about 15 minutes or till they are a nice golden colour.
Remove from oven, and after about 10 minutes, remove the cookies onto a wire rack to cool completely.
Store in an airtight container for not more than 5 days.
Makes about 30.


Fudgy butterscotch and white chocolate chip cookies


Cheese and onion pinwheels

2 comments


Unexpected guests. No, they were not staying for dinner, but didn't mind having a couple of drinks with us. My fridge and pantry were almost like Mother Hubbard's cupboard- almost bare. Not really in a mood to pick up the usual snacks from the nearest store, I felt like a contestant on one of those food game shows- produce a dish with 5 or less items.

A quick rummage through the fridge revealed cheese and the word "onion" popped into my head. Oregano and then the slab of butter caught my eye. So something with pastry it had to be and then the idea for pinwheels took shape.

In no time, the shortcrust pastry was made and while it was chilling in the fridge, I started on the filling.

Processed cheese, a finely chopped onion, the aforementioned oregano ( I guess rosemary would also have been fantastic), pepper and salt. The pastry was rolled out, the cheese mix spread out, rolled up, sliced, a quick egg wash and popped into the oven.

They were excellent with cocktails.

Cheese and onion pinwheels

Ingredients for shortcrust pastry
200 gm plain flour
1/4 teaspoon salt
100 gm cold unsalted butter, diced
Ice water to mix
1 beaten egg for glazing

Ingredients for cheese and onion filling
75 gm processed cheese, grated
1 onion, chopped fine
1 teaspoon oregano
Freshly milled pepper, to taste
A pinch of salt

Method
Sieve flour and salt into a mixing bowl, rub in butter till the mixture resembles breadcrumbs.
Add in ice water, a tablespoon at a time, gather together the crumbs very gently till the mixture forms a dough.
Do not knead or overwork the dough as the pastry will be tough.
Wrap the dough in clingfilm and keep in the fridge for 1/2 hour.
Mix together all the ingredients for the filling.
Preheat the oven to 200°C.
On a clean worktop, sprinkle a little flour, place the pastry on it and roll into an 8"x12" rectangle, keeping the edges straight.
With the longer edge facing you, spread the cheese filling evenly over, leaving the top 1/2 " plain.
Roll up tightly into a neat roll.
Use a sharp knife and slice into 1/2 " pieces.
Lay the slices on a lightly greased baking sheet.
Brush with beaten egg and bake for about 15-20 minutes or till golden brown.


Garlic, cheese and spring onion twist

3 comments


Do you like making bread?
Do you consider yeast a beast?
Do you follow a recipe for a yeast dough to a T?

I remember the first time I baked a cake - 14 years old, reading through the recipe at least 35 times, the sleepless night before. Then on D day, ingredients meticulously weighed out, every step read 10 times, and then proceeding to mix the batter. Then panic setting in when I realised I didn't know how to tell if the batter had been creamed enough, comforting myself that anyway, even if the cake flopped, no one would know as it was only for home consumption. Finally, the batter poured into the tin and dispatched into the oven. And the interminable wait- those were days when ovens did not have glass doors. Then the unmistakable aroma of cake baking. Opening the oven door at least 10 times to poke a skewer in to test if it was done.
And finally it was over. Baking time up, skewer test showing all was well and mitten-ed hands pulling the cake tin out of the oven. A 10 minute wait before the cake was flipped onto a wire rack. And too impatient to wait anymore, a slice carved out and the best darn cake anyone ever made (or so I thought!) was right in front of me...

I went through these same emotions when I started baking with yeast. By now, I was an expert at weighing  out ingredients. But yeast dough? How do you know if you've added enough water? Kneaded the dough sufficiently? Allowed it to rise long enough? Over-proofed? Under-proofed?


My aha moment came when I started experimenting with my first bread machine. No more huffing and puffing while kneading - the machine did all that and then it all began to make sense. Early man made bread, early man had no weighing scales, early man followed no recipes so why couldn't I improvise too?

  
So, after more flops than I care to remember, the intricacies of yeast became less mysterious. The basic dough is, well, basic. To an amount of flour, add some sugar, salt, yeast, maybe some fat, maybe some gluten and water of course. Knead till the dough is  springy and doesn't stick to your hands. Leave to rise, punch down, shape, then allow to rise a second time. Pop it into a really hot oven and bake.

How difficult is that?

And then there was no stopping me. I was not happy with the usual bread baked in a loaf tin. I wanted to bake buns, free form loaves, flatbreads, plaits, buns stuffed with chicken, with chocolate, apples, cheese, fish, mushrooms. And this garlic, cheese and spring onion twist which is my latest obsession.

This roll is a little messy to shape but more than makes up in taste, a classic combination of garlic, cheese and spring onions.

So now, do the twist with me!


Gather the ingredients. Knead the dough, and after the first proving, roll it out into a square. Spread a thin layer of butter over the top, sprinkle the garlic, cheese and spring onion mix along one side. Roll it up, Swiss roll style. With a really sharp knife, slice it half length-ways. Push the halves together, cut sides facing up and twist the dough.


When well twisted, place the dough on the baking sheet and shape it into a circle. Wet one end with a tiny bit of water and stick the other end to it.
Glaze the top with beaten egg, leave to proof for about 20 minutes then place in a preheated oven to bake.


Garlic, cheese and spring onion twist

Ingredients
250 gm flour
1 tsp salt
1/2 tsp gluten
2 tsps sugar
1 1/2  tsp yeast
2 tbsp oil
3/4 cup warm water
1 egg, beaten, for glazing

Filling
2 tbsp soft butter
6-8 garlic pips, chopped
3 cubes Britannia cheese, grated
5 stalks spring onions, remove bulbs and slice the green leaves
1/8 tsp salt

Method
Sift flour and salt onto a worktop, mix through improver, gluten, sugar and yeast.
Make a well in the centre, pour in water and oil, mix till it all comes together into a sticky dough.
Knead till the dough is soft and elastic and no longer sticky, about 10 minutes.
Place the dough into an oiled bowl, cover with clingfilm and leave to rise in a warm spot for about an hour or till the dough doubles in size.

Cut a sheet of parchment paper to fit the base of a baking sheet.

Mix all the ingredients for the filling, keep aside.
Remove the clingfilm from the bowl, punch down the dough to expel all the air.
Place the dough onto a lightly floured worktop, press into a flat disc and roll out into a 30 cm. square.
Spread the butter all over the square, spoon the filling only along the length of the dough closest to you.
Now roll up the dough as neatly as you can, tucking in stray bits of filling that may fall out.


Roll the finished shape back and forth to seal the edge and keep the shape. Dust a sharp knife with flour and cut the roll lengthwise into two halves.
Push the sides together, filling facing the ceiling and twist the whole roll.
Wet the ends with a bit of water and join them.


Transfer onto the prepared baking sheet, glaze with beaten egg and leave for the second rising.
Preheat the oven to 200°C.
The second proofing should be for 20 minutes.
Place the tray in the oven and bake for 20-25 minutes or till the roll is golden brown.
Tap the roll and if it sounds hollow, the roll is cooked through.
Carefully peel it off the paper and place the twist on a wire rack.


Chocolate chip and marzipan loaf cake

0 comments


Marzipan in a slice of cake. How lush can a slice of cake taste? We've all had slices of wedding cakes covered with marzipan and fondant. Then there's simnel cake, a fruit cake baked with a layer of marzipan in the middle and another one on top of the batter.

But this is a butter cake, the batter studded with chocolate chips and a layer of marzipan in the middle.

Susannah Blake's book "500 Cakes" has a recipe for such a cake. She gives an option of using candied cherries or chocolate chips. I preferred the latter. The marzipan was left over from a wedding cake I had done recently.

Quite an easy recipe- a creamed batter with chocolate chips mixed in. The recipe asks for the marzipan to be grated but mine was quite crumbly thanks to the time it had spent in the freezer.

The marzipan itself was a pretty simple thing to do- home ground almond powder, granulated sugar, icing sugar, a little egg white and some lime juice and brandy kneaded into a paste.

I played around with the measurement of the ingredients and when the loaf finally came out of the oven, it looked like any other loaf cake. What did I expect? But when it was sliced, aah, that was a different story.

Even though I had weighed out my batter, put exactly half in the pan, sprinkled the crumbled marzipan over evenly and then topped with the remaining batter, this is what it looked like after baking:


I had a look at the baked cake in the book and found the same wavy line of marzipan. So, then on to tasting.


Warm, buttery, a little dense and the lush taste of almond marzipan. Globules of chocolate chips yielding to the bite. Flavour overload.


Chocolate chip and marzipan loaf cake

Ingredients
150 gm flour
1 tsp baking powder
1/4 tsp salt
180 gm butter
150 gm sugar
1 tsp vanilla extract
3 eggs
40 gm almond powder
125 gm marzipan
110 gm dark chocolate chips

Method
Grease and base line an 8 1/2" x 5 1/2" loaf pan.
Sift flour, baking powder and salt, keep aside.
In a mixing bowl, place butter and sugar and beat on low speed till well combined.
Beat in eggs, one at a time till mixture is creamy.
Mix in almond powder, blend it in then fold in flour in three lots.
Stir through the chocolate chips.
Scoop half the batter into the tin, crumble the marzipan in an even layer over the surface then top with the remaining batter.
Bake in a  preheated 170°C oven for about 40 minutes, then reduce the temperature to 160°C for another 15 minutes.
Test the cake with a skewer and when done, remove from the oven.
Allow to cool for about 10 minutes then turn out onto a wire rack.

 
  • Bake Tales © 2012